One basic thing that great part of mods have is
Messages,
HUD and/or
Menus on the screen, to show info and options.
I will show in this tutorial what i know about drawing things on game screen.
Download the source code of this tutorial
hereNative methods
We have some cool methods that we can call to draw shapes and game textures on screen, they
must be called in a
tick or
loop, those are the ones that i know how to use:
DRAW_SPRITE_FRONT_BUFF (New: Added 15/11/2013)DRAW_CURVED_WINDOWDRAW_FRONTEND_HELPER_TEXTDRAW_RECTDRAW_SPRITE
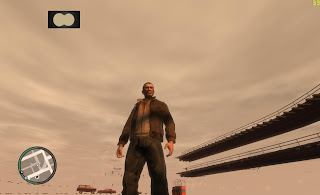
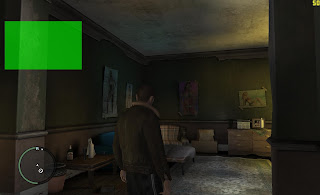
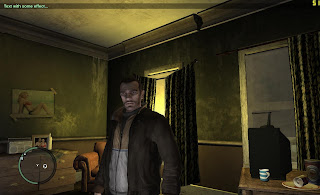
DRAW_SPRITE_FRONT_BUFF (New)
Native.Function.Call("DRAW_SPRITE_FRONT_BUFF", 0.2, 0.21, 0.3, 0.3, 0.0, 150, 190, 195, 200)
This method is interesting, it draws the actual screen on the specified area, its like a mirror of the reality but not mirrored ^^.
Params:
0.2 - X percent of the game screen to be the center of the window, 1.0 = 100%
0.21 - Y percent of the game screen to be the center of the window
0.3 - percent of the screen that will be the width of the window, 1.0 = full width
0.3 - percent of the screen that will be the height of the window
0.0 - rotation in degrees
150 - Red component of the color
190 - Green component of the color
195 - Blue component of the color
200 - Alpha component of the color
Result with those params:
DRAW_CURVED_WINDOW
Native.Function.Call("DRAW_CURVED_WINDOW", 0.1, 0.11, 0.2, 0.25, 200)Params:
0.1 - X percent of the game screen to be the X position of the window, 1.0 = 100%
0.11 - Y percent of the game screen to be the Y position of the window
0.2 - Width percent of the game screen to be the Width of the window, 1.0 = 100% = full screen width
0.25 - Height percent of the game screen to be the Height of the window
200 - Alpha value, 255 = full opaque, 0 = full transparent
Result:
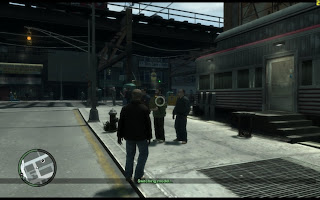
DRAW_FRONTEND_HELPER_TEXT
This method will draw game
predefined messages on right bottom corner and will display a key draw (Enter, Delete, Backspace, etc.):
Native.Function.Call("DRAW_FRONTEND_HELPER_TEXT", "ADD_FILTER_CAP", "INPUT_F_ENTER", 0)Params:
"ADD_FILTER_CAP" - This is the predefined message, you can find more in the
SCOCL files searching for the native method.
"INPUT_F_ENTER" - This will make the "Enter" game display message appears, you can find other examples in
SCOCL files.
0 - Not 100% sure what this does, but if the second call has an number 1 instead of 0, this message will appear below the previous, if its 0 it will appear in same line.
Result with first call with 0 and second call with 0:
Result with first call with 0 and second call with 1:
DRAW_RECT
This method will draw a rectangle o.O
Native.Function.Call("DRAW_RECT", 0.5, 0.52, 0.5, 0.2, 255, 100, 50, 150)Params:
0.5 - X percent of the game screen to be X center of the rectangle, 1.0 = 100%
0.52 - Y percent of the game screen to be Y center of the rectangle,
0.5 - Percent of the game screen that will be the Width of the rectangle, 1.0 = full width
0.2 - Percent of the game screen that will be the Height of the rectangle
255 - Red color amount
100 - Green color amount
50 - Blue color amount
150 - Alpha amount, 0 to 255
Result:
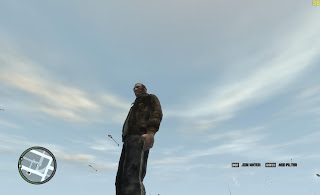
DRAW_SPRITE (Based on
Michael Wojtanis tip
)
This method will draw a game texture, it's very interesting.
This method requires that we load the
TXD and the
Texture that will be displayed before call the method, we need to do this
only one time, so, in the
Sub New of the project we can load it, in this example i'm loading at global variable declaration but i don't recommend this:
Params for LOAD_TXD:
"binoculars" - Name of the TXD where the texture is located
Params for GET_TEXTURE:
txd - The ID returned by LOAD_TXD call
"binoculars" - Name of the texture
Now that we have the texture
ID we can proceed and call the draw method in a tick:
Native.Function.Call("DRAW_SPRITE", tTexture, 0.2, 0.1, 0.1, 0.09, 0.0, 255, 255, 255, 255)
Params:
tTexture: The texture ID obtained with the previous two methods
0.2 - X percent of game screen to be the X of the center of the texture, 1.0 = 100%
0.1 - Y percent of game screen to be the Y of the center of the texture
0.1 - percent of game screen to be the Width of the texture, 1.0 = full width
0.09 - percent of game screen to be the Height of the texture
0.0 - rotation of the draw in degrees
255 - Red color amount
255 - Green color amount
255 - Blue color amount
255 - Alpha amount
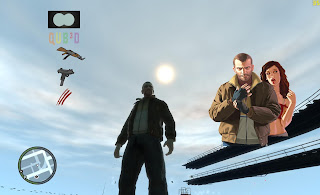
Result:
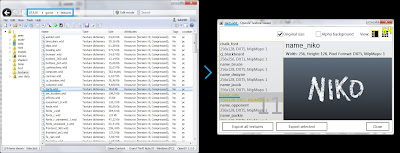
Using
OpenIV we can
discover the TXD and Textures
names and preview the Textures:
We can draw interesting things like gun icons, zombie scratch ( i never saw this in the game :( ), loading screen images, etc.:
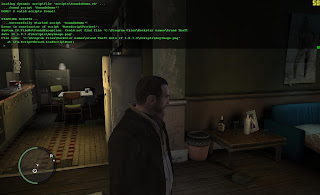
Drawing with the PerFrameDrawing event
Be
careful with this method, i recommend to only use the draw methods inside this event because you can cause
game crash or
lag if you do heavy things here, if this event stops, the frame drawing stops.
This is the method:
Using the "
e" object we will be able to draw
rectangles,
text,
lines and
textures (images)
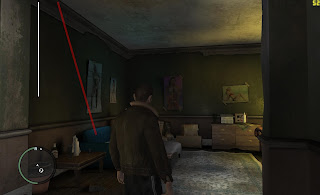
Drawing linese.Graphics.DrawLine(200, 10, 200, 500, 5, Color.White) ' white line
e.Graphics.DrawLine(300, 10, 500, 700, 10, Color.FromArgb(100, 255, 0, 0)) ' red line with alpha amount at 100
Params:
200 - X initial position
10 - Y initial position
200 - X final position
500 - Y final position
5 - Width of the line
Color.White - color of the line, you can use Color.FromArgb to have more control of the color components
Result:
Drawing rectangles
e.Graphics.DrawRectangle(225, 235, 400, 250, Color.FromArgb(150, 0, 255, 0))
Params:
225 - X that will be the X center of the rectangle
235 - Y that will be the Y center of the rectangle
400 - Width
250 - Height
Color.FromArgb(150, 0, 255, 0) - Color, in this case a green color with alpha amount at 150
Result:
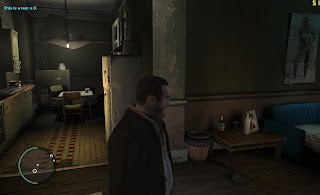
Drawing text
e.Graphics.DrawText("This is a text o.O", 20, 30, Color.FromArgb(255, 0, 255, 255))
Params:
"This is a text o.O"- the text :P
20 - initial X position
30 - initial Y position, left top corner of text
Color.FromArgb(255, 0, 255, 255) - the color, unfortunately the alpha low values only will make the text look more dark
We can change the
font too, but i don't know too much about this.
Result:
Drawing sprites (images)
To draw an
non game image on screen first we need to
read the bytes of this image and
create one Texture with those bytes:
We need the import of System.IO (or we can call System.IO.File...)
We need the Texture object
We need to read the bytes and create the Texture object, the path used is:
.\ - Results in current directory, GTAIV.exe/EFLC.exe folder
Scripts - inside current directory, Scripts folder
AnyImage.png - the image file inside Scripts folder, if this file don't exists script will crash because of exception at the byte reading:
So, make sure that the
image file exists and is readable.
Now that we have the texture loaded we can draw it on screen:
e.Graphics.DrawSprite(myImage, 500, 200, 100, 150, 0, Color.FromArgb(150, 255, 255, 255))
Params:
myImage - the Texture object created before
500 - X center of the image on screen
200 - Y center of the image on screen
100 - Width
150 - Height
0 - Rotation in degrees
Color.FromArgb(150, 255, 255, 255) - Color, this param is optional, the alpha amount don't will change anything, you can change the color components to obtain different color filters
Result:
Combining Rectangles and Text draws we can create cool Menus or Messages:
That's all what i know (until now) about drawing things on game screen, any tip is welcome ;)